Sunday, December 9, 2018
How to Find iPhone XR UDID
To register a device in the Apple Developer portal, one needs to enter their iPhone’s UDID for installing beta iOS updates and testing iPhone apps. Before the iPhone XS and iPhone XR, one could use iTunes to simply get the UDID of their device. For some strange reason though, this is no longer possible with the 2018 iPhones.
While there’s a way to get the iPhone XR’s UDID, the process is not as straightforward as it should be especially on a Mac. Worry not as we are here to help you out. Just follow the steps below. As for the iPhone XS and iPhone XS Max, you can find the steps to get its UDID easily in this guide.
How to Find UDID of iPhone XR on Mac
Step 1: Connect the iPhone to your PC. Then proceed to -> About This Mac.
Step 2: From the About This Mac window, click System Report followed by USB.
Step 3: Under the USB 3.0 Bus, you should see all the USB devices attached to your Mac including your iPhone. Click on it to reveal its properties.
Step 4: Copy the value next to the Serial Number label. Paste this value in Notes or any other note-taking app of your choice. You will then need to add a ‘-‘ after the eighth digit in the serial number.Must read:Gihosoft Free iPhone Data Recovery:https://www.gihosoft.com/iphone-data-recovery-free.html
So, if your iPhone’s serial number is 123456789ABCD, it will become something like this: 12345678-9ABCD.
How to Find UDID of iPhone XR on Windows
For Windows users, the process is relatively simple as they only need to make use of iFunbox tool to find the UDID of their iPhone XR. However, do note that you must install and update iTunes on your PC for iFunbox to detect your iPhone.
Some anti-virus apps might not play well with iFunbox as well and you might have to temporarily disable it. But then do make sure to turn it back on after you are done finding the UDID of your iPhone XR using iFunbox.
Thursday, October 25, 2018
How to Check for an iPhone Backup Viewer 2019
How to Check for an iPhone Backup Viewer
There are a number of iPhone backup viewers available for when you need to extract your data. However, before going out and getting this software, the following criteria will help you decide on the best one.
Data Types Supported: Be sure to look out for what data types this iPhone backup viewer supports. For most people, the most important data includes contacts, messages, WhatsApp messages, notes or some other SNS apps.
Backup Resources Supported: Be sure to check whether the backup viewer for Mac supports both iTunes backup and iCloud backup of your device.
Compatibility: It is no secret that Apple regularly rolls out new versions of the iOS. Ensure you choose an iPhone backup extractor that supports a wide selection of iOS versions – it's better to cover from iOS 9 to iOS 12. Also, be sure to check the model of your device to see if it is supported by a specific backup viewer. If it doesn't support iPhone Xs/Xr/Xs Max, then we cannot say that it is a good one.
Usability: With a wide selection of software available there is no need for users to choose one iPhone backup viewer that is ugly and hard to use. That's why the design and usability of an iPhone Backup Extractor are also one of the key criterions.
Reliability: A good iPhone backup viewer should be safe and virus-free, and able to extract and display your backup file without crashing.
Cost: Sadly, it is not easy to come across iPhone backup viewers that are free and reliable to use. Most require subscriptions to access most features. As extracting your important personal data from backup is crucial, compare the prices of said backup viewers before buying them.
If you lost data after you updated to a new iPhone, you can always use Gihosoft iPhone Data Recovery to get the data back from the old iPhone or backup.
Must Read:Jihosoft iTunes Backup Unlocker
You may also like:online youtube downloader
Thursday, October 18, 2018
What Exactly Is Viber Hidden Chat
These are chats on Viber that are hidden away in a different section and can only be opened using a certain Pin. Hidden chats will not appear in your regular chats list. People use this measure to have privacy on certain chats. So, it can be beneficial but how would you hide the chat?
How to Hide A Chat in Viber iPhone
As already mentioned, hiding your chat have some benefits, especially privacy. So if you want to hide a chat on Viber, you just need to follow the simple steps below.
Open Viber on your iPhone.
Choose the chat you want to hide and click.
Now, swipe the chat to the left.
Proceed to choose Hide chat and follow the prompts.
Once created, enter the 4-digit Pin and the chat will not show in the regular chats.
Now that you have known how to hide the chat, what about opening it? The steps below can help you.
How to Find and Open A Hidden Chat in Viber iPhone
Go to your Viber Chats interface.
On the search bar above, put your 4-digit PIN or use the name of the chat.
The hidden chat will be shown.
Now, click on it and input your 4-digit PIN to open the message.
That is all. Very simple, right? But….wait, what if you want to unhide a chat you already hidden? There is a different step to do that. Follow the steps below.
How to Unhide A Chat on Viber iPhone
Go to your Viber Chat interface again.
Swipe the screen to the left or just select the gear icon on the top-right corner of the interface.
Now, move down to locate “Unhide This Chat” option.
Click on the “Unhide this Chat” option and type your 4-digit PIN (you may choose to scan your Touch ID).
Once the PIN is confirmed, the chat will be visible in your chats interface.If you lost data after you updated to a new iPhone, you can always use Gihosoft iPhone Data Recovery to get the data back from the old iPhone or backup.
Must Read:Jihosoft iTunes Backup Unlocker
Jihosoft Photo Eraser
Free iTunes/iPhone Backup Extractor for iPhone, iPad
iPhone Backup Extractor - Extract Data from iPhone Backup
You may also like:online youtube downloader
With all the steps above, you can hide, find, or unhide a previously hidden chat. It is not complicated at all. So now, what if you want to delete the Viber message for privacy reason? That may sound impossible, but we have a solution.
Tuesday, October 9, 2018
4 Tips to Fix iCloud Backup Failed in iOS 12
Tip 1. Delete Older iCloud Backups
It is possible that the lack of adequate storage is causing the issue. In this case, deleting some of the older backups to create room for the new one may work. Here's how to do it.
Step 1: Tap on Settings and then iCloud.
Step 2: Then, go to Storage and tap on "Manage Storage".
Step 3: You should see a list of old backups. Select the one you can delete and then tap "Delete Backup".
Tip 2. Sign Out and Sign Back into iCloud
If it is not a storage problem, simply signing out and then signing back in has been known to do the trick. It's a simple, yet effective solution. Try it before resorting to more specialized solutions.
Tip 3. Reset Network Settings
Because backing up your device to iCloud often requires a Wi-Fi network, network problems may be to blame. In this case, resetting the network settings may fix the problem. Here's how to do it.
Step 1: Tap on Setting and then Select "General".
Step 2: Scroll down to find "Reset." Tap on it and then tap "Reset Network Settings".
Step 3: Enter your passcode to confirm.
If none of the above solutions work, you may need to find alternative ways to back up your iPhone. The following are the best ways,
Tip 4. Back Up iPhone with iTunes
Just as effective as iCloud, iTunes allows you to back up all the data on your device. Follow these simple steps to do it.
Step 1: Launch iTunes and connect the device to your computer. When asked to "Trust this Computer" follow the instructions on the screen.
Step 2: When the iPhone appears in iTunes, select it and then click "Back Up Now" and wait for the process to be completed. Keep the device connected to the computer until the process is complete.
Gihosoft Photo Eraser Erase unwanted objects and perfect your amazing photos!
If you lost data after you updated to a new iPhone, you can always use Gihosoft iPhone Data Recovery to get the data back from the old iPhone or backup.
Jihosoft Photo Eraser
Free iTunes/iPhone Backup Extractor for iPhone, iPad
iPhone Backup Extractor - Extract Data from iPhone Backup
You may also like:online youtube downloader
Saturday, September 8, 2018
How to Transfer Everything to New iPhone
Transfer Everything from My Old iPhone to My New One
Transfer Everything to New iPhone Using iTunes
If you are familiar with iTunes, you can use it as an option to move all data from one phone to another. Keep in mind, however, that while iTunes can transfer the majority of your data to your new phone, it will not transfer apps. As such, you will need to re-download your apps if you choose to use this method. Here’s how to do it:
Steps on how to transfer from old iPhone to new iPhone using iTunes:
Step 1: Plug your old phone into your laptop or PC and launch iTunes on your laptop or PC.
Step 2: In the menu bar, click on the iPhone icon.
Step 3: Click on “Encrypt Backup”. Click “Back up Now”.
Step 4: When the process if finished, unhook your phone from your computer.
Step 5: Plug your new iPhone into your laptop or PC.
Step 6:Turn your new phone on and slide to set up. Follow the set-up process.
Step 7:When prompted, select “Restore from iTunes Backup”.
Step 8: On your computer iTunes, select “Restore from this backup” and choose your most recent backup from the list. Enter your password if prompted.
With the help of iTunes, you can get the answer of “how do I transfer everything from my old iPhone to my new one?” now. As for your old iPhone, if you need to give it away you may need to erase all your personal information completely to avoid privacy leakage.
Option #2: Transfer Everything to New iPhone Using iCloud
Even though you can know the answer of “how do I transfer everything from my old iPhone to my new one?” by using iTunes, not everyone finds iTunes user friendly. For those who don’t, iCloud is another option for transferring data from one phone to another. Unfortunately, iCloud only holds a certain amount of data, so if your iCloud is full, you might not be able to transfer all of your previous data to your new phone. With that being said, as long as you are under the data limit, most data can be easily transferred using iCloud. Here’s how:
Step 1: On your old iPhone, go into your settings option
Step 2: Tap on the “Apple ID” option, and then click on “iCloud”
Step 3: Click on “iCloud Backup” and then “Backup Now”. Wait for backup to complete.
Step 4: Turn your old iPhone off, and transfer the SIM card to your new iPhone.
Step 5: Turn on your new iPhone and slide the Home Button to set it up. Follow the directions.
Step 6: Click on “Restore from iCloud backup” when prompted.
Step 7: Sign into your iCloud account using your Apple ID. Follow directions until you are completely signed in.
Step 8: Choose the backup you just made from your old iPhone. Wait for the process to complete.You may also like:Gihosoft Mobile Transfer: 1 Click Data Transfer from Phone to Phone
Gihosoft Android data recovery Free is a super awesome software specialized in Android file recovery. With this program, you are able to recover deleted photos, music, videos, messages, contacts, call logs, WhatsApp messages, Viber chat history and more from Samsung, Huawei, LG, HTC, Motorola, Google, Oneplus, Sony, Lenovo, ZTE and other Android devices directly. Meanwhile, this Android data recovery software is available for both Windows and Mac platforms.
For now, check:Free iTunes/iPhone Backup Extractor for iPhone, iPad
Jihosoft iTunes Backup Extractor free is a powerful tool to recover and extract important data from iPhone, iPad & iPod touch backup on Windows or Mac.
If you can’t sync with iTunes and want to rescue data from a disable iPhone, you could try Gihosoft iPhone Data Recovery. Also feel free to ask questions on the iDevice is disabled error in the comments section below.
Monday, August 20, 2018
Download iOS 12 Beta 9 without developer account
WHAT’S NEW IN IOS 12 BETA 9?
iOS 12 Beta 9 is by far the most minor update released Unlike its predecessors, it doesn’t resolve a single issue. Its release notes consist entirely of new “features” and “known issues” and are devoid of any “resolve issue”. Surprisingly, the T-Mobile WiFi calling is still present in this version.
iOS 12 Beta 9 weighs around 200-300 MB on all compatible devices and its build number is 16A5362a. As far as new features go, there are plenty of improvements in CoreML.
Apple’s machine learning framework now supports quantized models, flexible image sizes, custom models, and multi-array shapes. In addition, CoreML now has its own Batch prediction API.
If you are enrolled in the Apple Developer Program, this version will be available from the Developer Center. Alternatively, you can download and install this beta version using the links given below.
DOWNLOAD LINKS FOR IOS 12 BETA 9
OTA PROFILE
IPHONE
iPhone SE, iPhone 5s
iPhone 6s, iPhone 6
iPhone 6s Plus, iPhone 6 Plus
iPhone 8, iPhone 7
iPhone 8 Plus, iPhone 7 Plus
iPhone X
IPAD
iPad Air, iPad mini 2
iPad mini 4, iPad Air 2, iPad mini 3
iPad (5th generation), iPad (6th generation)
iPad Pro (9.7‑inch)
iPad Pro (12.9‑inch)
iPad Pro (10.5-inch), iPad Pro (12.9-inch) (2nd generation)
IPOD
iPod touch (6th generation)
SHOULD YOU UPDATE?
Since this update brings nothing new to the table, you will be just fine should you decide not to install it. However, if you are experiencing performance issues on iOS 12 Beta 8 or below, I would recommend upgrading your device as soon as possible.
Beta 9 is probably one of the last beta versions of iOS 12 as we head towards the September event. If you are not a beta junkie, you can safely miss the next few beta updates and switch over directly to the final build.You may also like:online youtube downloader
For now, check:Free iTunes/iPhone Backup Extractor for iPhone, iPad
Jihosoft iTunes Backup Extractor free is a powerful tool to recover and extract important data from iPhone, iPad & iPod touch backup on Windows or Mac.
Jihosoft Android Data Recovery: the best Android Data Recovery software for Windows and Mac to recover deleted contacts, messages, photos, videos, WhatsApp and etc from Android devices.
Wednesday, August 15, 2018
Download iOS 12 Beta 8 without developer account
WHAT’S NEW IN IOS 12 BETA 8?
Unlike previous beta versions, this update only improves performance without bringing any new enhancements. Its build number is 16A5357b and the update weighs about 100-400 MB on all compatible devices.
According to its release notes, the poor performance of Beta 7 is now fixed. Group FaceTime calls continue to elude users as usual.
The eight beta also quashes a few other bugs. However, the bug that forces the Settings app to close is still present.
You can download this update from Apple Developer Center if you have a paid developer account. If you are an average user who wants to update to the latest version, you can use the download links below.
Important – Download links will go live within a few minutes.
IOS 12 BETA 8 DOWNLOAD
OTA Profile
SHOULD YOU UPDATE YOUR DEVICE?
This update is critical and if you updated to iOS 12 Beta 7 a few days ago, you must update your device again to iOS 12 Beta 8. Users who have already updated confirm that this version fixes performance issues of the previous beta.
Jihosoft Giveaway Alert:
iPhone Backup Extractor - Extract Data from iPhone Backup
The best iPhone Backup Extractor software to extract photos, text messages, contacts, voice memos, note, WhatsApp, Viber and etc from iPhone/iPad backup.
Must Read:Jihosoft iTunes Backup Unlocker
Jihosoft Android Data Recovery: the best Android Data Recovery software for Windows and Mac to recover deleted contacts, messages, photos, videos, WhatsApp and etc from Android devices.
Monday, August 13, 2018
How to Reset iPhone/iPad without Apple ID When "Find My iPhone" is Off
If “Find My iPhone” feature of iCloud is not enabled on your iPhone, then you can directly reset your iPhone from Settings.
On your iPhone, go to “Settings > General > Reset > Erase All Content and Settings”. If you set up iPhone password, you need to enter to confirm. When it’s confirmed, it will start resetting your iPhone.
Sponsor Ads:
Gihosoft Free iPhone Data Recovery is a professional iPhone Data Recovery software to get back all your lost text message, photo, video, call history, note, contact and more from iPhone/iPad/iPod Touch.
Monday, August 6, 2018
[Solution]How to Fix Twitter Not Working on iPhone or iPad
[Solution]How to Fix Twitter Not Working on iPhone or iPad
Fix Twitter Not Working on iPhone or iPad
Twitter isn’t working on your iPhone or iPad. You’re frustrated as you can’t tweet your heart out. This post goes in depth about why Twitter not working on iPhone or iPad and how you can address the issue once and forever.
Twitter App Not Working On iPhone or iPad? Here Are 7 Fixes
Well, we can’t give an exact reasoning for your case, it could be a potential hardware problem or an issue with an app itself. Below we’ve addressed each potential cause step by step and also highlighted what you can do in each scenario to fix the problem for good.
#1: Close All of Your Currently Running Apps
Doing so will give a fresh start to each app. We recommend closing out of all applications, not just the Twitter iPhone app. It could be that another application has crashed in the background, and it’s the reason why Twitter app doesn’t load properly.
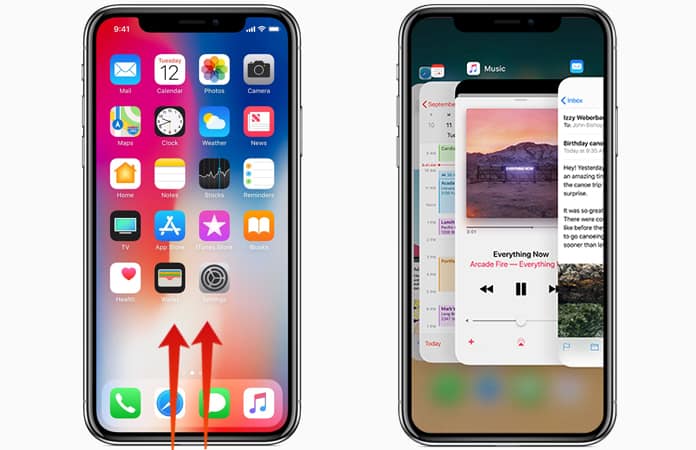
To close out every application, launch the App Switcher by “double-tapping Home” button – you’ll see all apps currently functioning on your device. To close out from an application, use a finger to swipe up on an application until it no longer shows in the App Switcher. When the App Switcher just displays the Home Screen, it means all apps are closed. By the way, you can close two apps together by using two fingers to swipe up both apps together.
#2: Update The Twitter iPhone Application
Application developers often release updates for their apps to resolve security bugs, integrate new features, and address software glitches. It could be that the latest version of the Twitter app isn’t installed on your handset.
To see if there’s an update available, launch the App Store, tap “Updates” in the lower right-hand corner of the screen, and see what pending updates are available. Tap the blue “Update” icon to the right of the app if there’s one available for Twitter.
If multiple updates are available on your handset, you can tap “Update All” in the screen’s right hand corner – and all apps will get updated (though it happens one by one).
#3: Uninstall Twitter App & Install It Again
When Twitter consistently fails to work on your handset, just uninstall it, then reinstall it. Uninstalling it would erase all the data saved through Twitter on your iDevice. Hence, if the app had a corrupted software saved, that’d too be removed.
To uninstall it, press and hold the Twitter app icon until all apps start shaking. Then a little “x” icon will show on the top left corner of most apps. Tap the “x” on the Twitter app and choose “Delete” when the iPhone prompts you to.
For reinstallation, go to the App Store and type “Twitter” in the search field. Then tap “Get” > “Install” to reinstall the Twitter application. Since the app was previously installed, you can see an icon that will show as a cloud with a pointed down arrow. Tap it to start the app installation. After the installation open the app and check if it’s working. Twitter not working on iPhone or iPad again? Try the next solutions.
Will Your Twitter Account Get Deleted Upon Uninstallation?
There’s no reason to worry – your Twitter account won’t get deleted if the app is removed from your iDevice. However, you’ll have to log in once again when you reinstall Twitter, so make sure you’re aware of the password.
#4: Update Firmware to The Latest iOS Version
Just like app developers release updates for their apps, Apple often releases software updates for iOS. If the most recent version of iOS isn’t installed on your handset, your iDevice may experience specific software issues that could be addressed by updating to the most recent iOS version.
To see if an update is available for iOS on your iDevice, launch “Settings” and tap “General > Software Update”. If you see an update, tap “Download and Install”. Ensure that your iDevice is connected with a power source or has more than half battery, otherwise the update won’t start.
If the recent version of iOS app is already installed on your device, you’ll see the following message “Your software is up to date” on the screen.
#5: WiFi Troubleshooting On Your Device
If you followed all the above mentioned steps, and WiFi still didn’t function on your handset, it’s time to move to the next section of this guide to diagnose the connection of WiFi. It could be that your WiFi connection is the reason why Twitter not working on iPhone, iPad or iPod touch.
#5.1: Switch Off WiFi, then Turn It On Again
Switching WiFi off and on might fix issues that could have been there when you first connected to WiFi. In some instances, a minor software glitch could occur when you attempt to connect your handset to WiFi, which may cause the device to malfunction if you attempt to do something on the web.
One of the quickest ways to switch WiFI off and turn it on again is in the Control Center, which can be launched by swiping up from the screen’s bottom on your iDevice.
See the WiFi icon – if it’s white inside the blue circle, it means it’s active. To switch it off, tap the scroll. When the icon inside the gray circle is black, it means the WiFi is off. Tap it again to turn it on.
You can also switch off WiFi by launching “Settings” and tapping “WiFi”l. Besides WiFi, there’ll be a small switch that will go green if the WiFi is active. To switch it off, tap the switch – the switch will be gray when the WiFi is off. Enable it again by tapping the switch once again.
#5.2: Connect to A Different WiFi Network
In some instances, the iDevice might only have problems connecting with your WiFi network particularly, which means there is an issue with your wireless router, not the device. To see if it’s the case, connect to another network. If you see that Twitter doesn’t open when the device is connected to your home network, the problem is probably happening because of the router. Switch the router off and then turn it back on. Get in touch with your internet provider if the problem continues to happen.
#5.3: Forget WiFi Network
When you connect your WiFi network to an iPhone for the first time, the device remembers how you connected to it. However, if the saved data gets outdated, it could result in connectivity problems. It’s best to instruct the device to forget the WiFi network in a case like this.
To forget WiFi, launch Settings and tap “WiFi” besides the WiFi network you want the iPhone to forget, tap “more information”, and then select Forget This Network. Once you’ve forgotten the WiFi network, launch “Settings”, and tap “WiFi” one more time. Tap on the WiFi network you asked iPhone to forget to reconnect to it.
#5.4: Reset Network Settings
As a final step, we recommend to Reset Network Settings if Twitter app not working on your iPad or iPhone. This will, however, erase all settings for Bluetooth, VPN and WiFi. It can be extremely challenging to track down the exact source of software problem on your iDevice, so let us erase all the network settings that are stored on your handset.
Before you start this process, however make sure all your WiFi passwords are noted. That’s because you’ll need to provide these details again when you do a reconnect
For Resetting Network Settings on your iDevice, launch “Settings” > General > Reset. Once that’s done, choose “Reset Network Settings” and enter your passcode. When you’re once again prompted, tap “Reset Network Settings” to launch the reset. When the reset completes, your iPad or iPhone should reboot.
#6: Inquire About the Status of Twitter Servers
Once in a while, Twitter’s servers crash, or their maintenance team performs routine maintenance to improve their app and servers for millions of people around the world. If Twitter doesn’t function on your handset, perform a quick “Google search” for Twitter server status to see if other people are experiencing the same issue.
If you see several reports about the Twitter network being down, it’s highly certain that they’re performing routine maintenance and that Twitter will be active again in while.
#7: Hardware Issues? Explore Repair Choices
As we mentioned earlier, there’s a tiny chance that your device has a hardware issue. iDevices have a tiny antenna that allows them to connect with WiFi networks, as well as pair Bluetooth gadgets. If you’re experiencing either or both issues again and again, there could be a hardware problem with the antenna.
To this end, we recommend setting an appointment at your local Apple Store with the folks over at the Genius bar. They’ll help you identify whether or not you need a repair.
If you accidentally lost any photo saved from Twiiter on iPhone, you can use Gihosoft iPhone Data Recovey to retrieve deleted photos from iOS device.
Photo recovery free photo recovery 100% free to restore deleted/formatted/lost pictures in just three steps Photo recovery
free photo recovery software.
Any app suggestions or topic recommendations are appreciated in the comments down below.
Friday, July 27, 2018
How to back up the iPhone and iPad on iTunes
Step # 1. Connect your iPhone to the # 39 computer and launch iTunes.
Step # 2. When you are prompted to trust this computer, press Trust in the pop-up window of your iPhone.If you lost videos from iOS Camerall Roll which are nowhere to download again, you can use Gihosoft iPhone Data Recovery to get back deleted videos from iOS device including iPhone, iPad and iPod Touch.
Jihosoft iPhone Backup Extractor Extract and recover all types of data from iPhone backup files, such as camera roll photos, videos, SMS, contacts, reminders, WhatsApp, and etc.
Step # 3. Click on your iPhone in the left menu
Note: As mentioned above, the iTunes backup does not usually include any personal information like saved passwords. If you want to save this information, you must encrypt the backup. To do this, select the Encrypt [device] backup dialog box and set a password.
Step # 4. Finally, click "Back up now."
Then, wait and let the backup finish properly. Once done, you can check the date and time of the last backup on the screen Summary
That's about it!
Monday, July 23, 2018
How to fix iPhone showing phantom unread text message notification when none pending
Many iPhone X/7 and iPhone 6s users are facing issue with iOS 11 and iOS 12 that Messages app icon shows one unread message on the app icon, but there are no unread messages anywhere in the app left to read. The ghost message issue is also in iPad as well. This seems like a phantom address is lying in the iPhone as iPhone shows a number one as an unread text message and you won’t have any unread messages.
The messages app notification badge won’t go away when there are no pending SMS. it is annoying and can let user ignore some important messages due to this issue. The iPhone user tried hard to find out the unread message but there are none and message app in showing unread badge/notifications. The issue happen to occur more frequently on iOS11/iOS12 upgrade.
User can’t really find out why iPhone showing phantom unread text message indicator one Message app and the message notification won't go away ios 11 as Notification badges will not clear from Messages App.
How to fix iPhone showing ghost unread message icon :
Fix 1 : Clear the notification and reset
First turn off the Notifications in settings. Now restart iphone by power down the iPhone, power up again, turned on Notifications, now the false indicator should go away or you should be able to see the unread message.
Fix 2 : Hard reboot iPhone
Perform and hard reset to your iPhone by holding the power button and home button until apple logo appears and a force reboot happens. This fixed the issue fir many users.
Fix 3 :Login and logout from icloud
Try by logging out from the iCloud and restarted the iPad/iPhone. This should clear the fake unread message notification.
Fix 4: Do iOS restore
Back up the iPhone to computer using iTunes. Now use iTunes to reset and restore the iPad/iPhone. This should get away ghost notifications from message.If you lost videos from iOS Camerall Roll which are nowhere to download again, you can use Gihosoft iPhone Data Recovery to get back deleted videos from iOS device including iPhone, iPad and iPod Touch.
Jihosoft iPhone Backup Extractor Extract and recover all types of data from iPhone backup files, such as camera roll photos, videos, SMS, contacts, reminders, WhatsApp, and etc.
Gihosoft Android data recovery Free is a super awesome software specialized in Android file recovery. With this program, you are able to recover deleted photos, music, videos, messages, contacts, call logs, WhatsApp messages, Viber chat history and more from Samsung, Huawei, LG, HTC, Motorola, Google, Oneplus, Sony, Lenovo, ZTE and other Android devices directly. Meanwhile, this Android data recovery software is available for both Windows and Mac platforms.
Monday, July 16, 2018
How to duplicate the Voice Memos on iPhone in iOS 12
On iPhone, iPad
Step #1: Open up the “Voice Memos” app on your iPhone.
Step #2: Select and “open the recording” of which you want to make a duplicate.
Step #3: Now, hit the “three dots” below the recording.
Step #4: Choose the “Duplicate” option.
That’s it! Once you will tap on the Duplicate option, it will create a duplicate file of the existing recording with postfix name …copy.
Note: we didn’t find way to duplicate voice memo on iPad. If you get, comment me on bottom cement box of this article.
Keep note that there are other options available when you tap on three dots, Sharing Voice Memos, Deleting and Edit memos.
Jihosoft iPhone Backup Extractor Extract and recover all types of data from iPhone backup files, such as camera roll photos, videos, SMS, contacts, reminders, WhatsApp, and etc.
Gihosoft Free iPhone Data Recovery is a professional iPhone Data Recovery software to get back all your lost text message, photo, video, call history, note, contact and more from iPhone/iPad/iPod Touch.
Friday, July 13, 2018
MacBook Pro 2018 – features, specifications, and price 2018
FEATURES
1. EIGHTH-GENERATION INTEL PROCESSORS
The new models of MacBook Pro with Touch Bar come with the powerful eighth-generation Intel Core processors.
The 15-inch model boasts of Intel’s six-core i7 processor with up to 70 percent faster performance. Buyers can also opt for an Intel Core i9 upgrade.
The 13-inch model, on the other hand, comes with a quad-core i5 or i7 Coffee Lake processor with 50 percent faster performance.
The new CPUs make the new laptop lineup perfect for video editing, image processing, simulations, audio projects, etc. However, this increase in performance will also deteriorate the battery capacity to a slight extent.
2. MORE MEMORY
Both laptops come with a stock SSD storage of 256GB. The 13-inch model offers expandability up to 2TB of storage while the 15-inch model offers expandability up to 4TB giving you full freedom to store a large amount of data locally.
As far as RAM goes, the 13-inch variant has an LPDDR3 RAM of 8GB. The 15-inch model has 32 GB of LPDDR4 RAM.
3. POWERFUL GRAPHICS CARDS
The 13-inch model comes with Intel’s Iris Plus 655 integrated graphics card while the 15-inch model comes with the powerful Radeon Pro 555X with 4GB VRAM.
4. HEY SIRI
The new MacBooks are the first Apple laptops to be equipped with an additional T2 chip.
For the uninitiated, the T2 chip is responsible for starting Siri with the phrase “Hello, Siri” and for storing encrypted data.
5. TRUE TONE DISPLAY
The new MacBook Pro also receives support for Apple’s True Tone technology, which is available exclusively available on iPad Pro and iPhone X.
This display technology automatically adjusts the color temperature depending on the ambient light conditions.
6. OTHER FEATURES
Other knick-knacks include –
Force touch trackpad
Touch ID
Touch Bar
Dynamic stereo speakers
Silent cooling system
Thunderbolt 3 ports for data transfer
Connection of up to two 5K screens or four external GPUs
SPECIFICATIONS
13-INCH MACBOOK PRO
2.3GHz Intel Core i5 and i7 quad-core processors
Turbo Boost up to 4.5 GHz
8GB 2133MHz LPDDR3 memory
Intel Iris Plus 655 integrated graphics with 128MB of eDRAM
256GB of SSD storage expandable up to 2TB
True Tone screen technology
Apple T2 Chip
Touch Bar
Touch ID
Four Thunderbolt 3 ports
15-INCH MACBOOK PRO
2.9GHz Intel Core i7 and Core i9 processors with six cores
Turbo Boost up to 4.8GHz
Up to 32GB of DDR4 memory
Radeon Pro graphics with 4GB of video memory
256GB of SSD storage expandable up to 4TB
True Tone screen technology
Apple T2 Chip
Touch Bar
Touch ID
Four Thunderbolt 3 ports
PRICE AND AVAILABLITY
The 15-inch variant of MacBook Pro can be yours for $2,799 whereas the 13-inch model will leave your pocket lighter by $1,999.00 (VAT included).
Both laptops are already available on the official website of Apple and in several Apple Stores as well.
If your local Apple Store isn’t carrying these products right now, it will do so in the coming weeks.
Apple has already started shipping the products to buyers who ordered the product beginning today. If you were waiting for the new MacBook to drop, go ahead and get yourself one.Sponsor Ads:
Gihosoft Free iPhone Data Recovery is a professional iPhone Data Recovery software to get back all your lost text message, photo, video, call history, note, contact and more from iPhone/iPad/iPod Touch. It offers a full solution to recover your lost data in different tough situations. Besides recovering data directly from iPhone, iPad and iPod touch, it also allows you to recover data from iCloud and iTunes backup files.
Tuesday, July 10, 2018
Panda Helper Download without Cydia for your iDevice
What is Panda Helper ? This is one of the best third party app store which included most useful and valuable applications for users. Panda store can install without jailbreaking your device and also this store ready with more than thousand’s applications for users. Panda helper already downloaded thousands of users and this valuable application has much more resources for users
Panda Helper features
Download Paid apps for FREE
Tweaked apps and hacked games are ready to free for you
Ready to install without jailbreak/ No Cydia needed
User friendly application for users
Apps install without Apple ID
Panda Helper requirements
Apple iPhone, iPad, iPod Touch devices
Follow Safari browser to install application
iOS 8+
How to install Panda Helper
First download Cydia helper application for your device – Click Here (Safari Users)
Then tap Panda Helper to install application
Tap Install to add application for your device
You can see Panda helper ready with your device after few seconds
Tap It and enjoy with another app store called Panda Helper
How to fix Panda Helper Errors
Restart Device to avoid application installation errors
If you already installed application & not functioning properly, Better to delete application from your device before install new Panda Helper application (Delete application follow this this path settings > Genera > Profile & Device Management)
Sponsor Ads:
Gihosoft Free iPhone Data Recovery is a professional iPhone Data Recovery software to get back all your lost text message, photo, video, call history, note, contact and more from iPhone/iPad/iPod Touch.
Gihosoft Android data recovery Free is a super awesome software specialized in Android file recovery. With this program, you are able to recover deleted photos, music, videos, messages, contacts, call logs, WhatsApp messages, Viber chat history and more from Samsung, Huawei, LG, HTC, Motorola, Google, Oneplus, Sony, Lenovo, ZTE and other Android devices directly. Meanwhile, this Android data recovery software is available for both Windows and Mac platforms.
Saturday, July 7, 2018
Methods to Fix “iTunes Sync Session Failed to Start”
Common Solutions
These other common solutions will help you to fix “iTunes sync session failed to start” issue, and they are as follows.
1. Fix sync session failed to start by updating iTunes: “iTunes sync session failed to start” error may be stemming from outdated iTunes and iTunes component software. To update iTunes to its latest version follow these steps:
- Step 1: Connect your PC to a network. Launch iTunes and go to “Help > Check for Update”.Related Articles:How to enable usb debugging on Android from computer
- Step 2: follow the prompts to update your iTunes.
2. Fix sync session failed to start by deleting old iTunes backups: If your iTunes library is corrupt, then it is better your delete it to stop this error message from popping up.
- Step 1: Choose iTunes > Preferences (for Mac). Choose Edit > Preferences (for Windows).
- Step 2: Click Devices.
- Step 3: Select the backup you want to delete, you can hover your cursor on the backup to see more details.
- Step 4: Click Delete Backup, then Confirm.
Tuesday, July 3, 2018
Download iOS 12 Beta 3 without developer account
Apple just seeded the third beta version of iOS 12 firmware to registered developers. Download iOS 12 Beta 3 on your iPhone, iPad, and iPod touch using the links below.
Table of Contents
What’s new in iOS 12 Beta 3?
iOS 12 Beta 3 Download
OTA Profile
iPhone
iPad
iPod
Should you upgrade?
WHAT’S NEW IN IOS 12 BETA 3?
iOS 12 Beta 3 comes with a lot of bug fixes and enhancements but lacks any major new features. Its build number is 16A5318d and weighs 578 MB on the iPhone 8.
If you install this update on your device, you may need to unlock it should you connect it to a Mac, PC, or other USB accessories.
Most trending:Top 6 Best Free Movie Apps for iPhone or iPad in 2018
Moreover, if you own an iAP USB accessory such as CarPlay or a charger, you may need to unlock your device in order to recognize it.
Here’s the complete list of major bugs that will no longer bug you –
Weather widget glitch from beta 2 fixed.
FaceTime fixed.
Upgrading to iOS 12 beta using iTunes fixed
Skype/ Taobao/Twitter issues fixed.
Playback may not stop when one of the AirPods is removed.
Buggy voicemail notifications.
“Hey Siri” setup on Chinese, Japanese, and Korean.
SMS and Phone Call spam classification extensions display a black screen.
Apart from the aforementioned fixes, beta 3 also patches a lot of other bugs. However, some bugs and glitches such as the GPS bug, Fortnite crashing on launch and Netflix quitting while downloading videos are still not fixed. You can check out the full release notes here.
Along with iOS 12, watchOS 5.0, tvOS 12.0, macOS 10.14 Mojave have also received a third beta.
If you are enrolled in Apple’s developer program, the update shall appear in your developer center. As far as non-developers are concerned, you can download and upgrade to the latest beta using the OTA Profile or IPSW firmware file.
Most trending:Top 6 Best Free Movie Apps for iPhone or iPad in 2018
Note – The download links given below will go live within a few minutes.
IOS 12 BETA 3 DOWNLOAD
OTA PROFILE
Download
IPHONE
iPhone SE, iPhone 5s
iPhone 6s, iPhone 6
iPhone 6s Plus, iPhone 6 Plus
iPhone 8, iPhone 7
iPhone 8 Plus, iPhone 7 Plus
iPhone X
IPAD
iPad Air, iPad mini 2
iPad mini 4, iPad Air 2, iPad mini 3
iPad (9.7-inch)
iPad Pro (9.7‑inch)
iPad Pro (10.5-inch), iPad Pro (12.9-inch) (2nd generation)
IPOD
iPod touch (6th generation)
SHOULD YOU UPGRADE?
Yes, this update comes with a lot of patches and bug fixes. If you are already on iOS 12 Beta 2 or Beta 1, you should update your device.
For those of you who are still on iOS 11.4, you should stay where you are and wait for Apple to release a stable public version.
Do you like this story?
Sponsor Ads:
Gihosoft Free iPhone Data Recovery is a professional iPhone Data Recovery software to get back all your lost text message, photo, video, call history, note, contact and more from iPhone/iPad/iPod Touch. It offers a full solution to recover your lost data in different tough situations. Besides recovering data directly from iPhone, iPad and iPod touch, it also allows you to recover data from iCloud and iTunes backup files.
Wednesday, June 27, 2018
Fix iTunes Error 29
Other Ways to Fix iTunes Error 29
Following are some other ways to fix iTunes error 29:
1.Replace Battery
As mentioned above, iTunes error 29 may occur if your iPhone has a malfunctioning battery. If you have recently changed your iPhone’s battery, then it is recommended that you replace it with an original one and then try the restore/update process in iTunes. Chances are that the error 29 will not occur after replacing iPhone’s battery.
2.Turn Off the Anti-Virus
Sometimes anti-virus programs can prevent iTunes from connecting to Apple servers and performing operations seamlessly. If you have anti-virus software installed on your computer and you are encountering iTunes error 29, then it is recommended that you temporarily turn the anti-virus off and then try to update/restore your iPhone. If the restoration or updating process is successful, then you can turn the anti-virus on afterwards.
3.Restore Without SIM Card
Some users have reported that restoring/updating iPhone without SIM card have solved their iTunes error 29. So, it is worth a try. Simply remove the SIM card from your iPhone, restart the device, and then try the restore/update process again. The problem should be solved now.
4.Update iTunes
If your iTunes is outdated, then it may fail to properly recognize the device or newer hardware characteristics that may lead to error 29. So, it is highly recommended that you update iTunes to the latest version. Follow these instructions:
Step 1: Launch iTunes.
Step 2: Navigate to Help > Check for Updates.
Step 3: Follow the on-screen instructions to update iTunes to the latest version.
5.Factory Reset iPhone
If none of the above-mentioned solutions worked, then it is recommended that you reset your iPhone. Follow these instructions:
Step 1: Open Settings app on your iPhone.
Step 2: Navigate to General > Reset and then choose Erase All Content and Settings option to reset your device.
Step 3: After the reset, try the update/restore process again. It should work without any problems.Gihosoft iPhone Data Recovery is a professional iPhone Data Recovery software to get back all your lost text message, photo, video, call history, note, contact and more from iPhone/iPad/iPod Touch. It offers a full solution to recover your lost data in different tough situations. Besides recovering data directly from iPhone, iPad and iPod touch, it also allows you to recover data from iCloud and iTunes backup files.
Tuesday, June 26, 2018
How to add Playlist to iPhone with iTunes
You don’t need to add any special skill or technician to help you add music to your iPhone. iTunes has got you covered. It is the number one application by Apple that you can use for free and enjoy music on your Apple devices. All you need to do is synchronize the two devices. When mentioning iTunes, it is common to focus on its limitations, what it doesn’t allow and how it inconveniences its users on compatibility and efficiency especially when it comes to moving other files, which are not music.
Gihosoft iPhone Data Recovery is a professional iPhone Data Recovery software to get back all your lost text message, photo, video, call history, note, contact and more from iPhone/iPad/iPod Touch. It offers a full solution to recover your lost data in different tough situations. Besides recovering data directly from iPhone, iPad and iPod touch, it also allows you to recover data from iCloud and iTunes backup files.
Here are the simple steps to add playlist to iPhone with iTunes:
- Connect your iPhone to PC with a USB cable, launch iTunes.
- On the left panel, select ‘music’.
- Be sure to check the ‘sync music’ box. It is usually automatically selected.
- Click on ‘selected playlists, artists, albums, and genres ’.
- Choose the playlist you want.
- Select ‘sync’ and you will have the playlist on your phone.
Of course, the limitations of iTunes cannot be ignored and we often seek alternatives to improve efficiency and use of our iPhones. TunesMate is a primary choice. It allows you easily add, edit or delete playlists and import whichever songs you like in any playlist without erasing previous data.
How to share password on iOS 12
Apple has made sharing passwords a cakewalk in it’s iOS 12 release. Now you can easily share passwords using iOS password managing application – AirDrop. You simply need to open the settings on your iOS device and open “website and app passwords”. You then need to login, enter your password, and an option to AirDrop the login will prompt. You can AirDrop the password to any iOS 12 device or macOS Mojave device. Users on both ends – sending and receiving need to authenticate their Face ID or Touch ID. Once the authentication is complete, you’ll be able to send or receive a password.
With iOS 12, Apple smart’s feature will enable iOS users to create passwords and suggest strong passwords. It will also provide you with tools to retrieve passwords irrespective of where the account was created. Also, Siri will be able to help you with your passwords in iOS 12. Even if you just say – “Siri show my password”, Siri will do the job for you.Gihosoft iPhone Data Recovery is a professional iPhone Data Recovery software to get back all your lost text message, photo, video, call history, note, contact and more from iPhone/iPad/iPod Touch. It offers a full solution to recover your lost data in different tough situations. Besides recovering data directly from iPhone, iPad and iPod touch, it also allows you to recover data from iCloud and iTunes backup files.
Friday, June 8, 2018
How to Enable Do not Disturb Bedtime Mode in iOS 12
Sometimes you get a number of annoying notifications at bedtime but with iOS 12 Do not Disturb Bedtime feature enabled, your display gets dimmed and all notifications become hidden.
When activating iOS 12 Bedtime Mode on Do not disturb, you can still use your iPhone with full comfortability with no any distraction and annoying alerts.
How to Enable Do not Disturb Bedtime in iOS 12
Enabling Do not disturb when you are in bed in iOS 12 from iPhone or iPad is very easy and is a most important task to do when you don’t want any interruption while in bedtime. This helps you in the situation like when you are in sleep or doing the personal work or in private night :).
Here’s how to enable Do Not Disturb at bedtime in iOS 12;
1. Launch Settings app on your iPhone or iPad ⇒ Tap on Do Not Disturb
2. Toggle ON the switch to enable Do Not Disturb.
3. Next there you will find the Scheduled toggle switch, simply turn on the Scheduled switch to green.
4. Now Set the time to sleep and Turn on the Bedtime mode switch down to the Schedule time.
That’s all!
By enabling the iOS 12 Bedtime feature helps you to sleep with no disturbance and will be automatically activated at your set time each night.
Similarly, if you want to disable the Bedtime Mode, follow the same steps to turn it off.
How to Disable Do not Disturb Bedtime Mode in iOS 12
1. Like above launch Settings app on iPhone or iPad ⇒ Tap on Do Not Disturb.
2. Now, just below turn off the Bedtime Mode toggle switch.
Like this feature? Let us know in the comments if this Bedtime Mode helped you enjoy a better sleep at night.
Gihosoft iPhone Data Recovery Free:https://www.gihosoft.com/iphone-data-recovery-free.html
Gihosoft iPhone Data Recovery is a completely free yet powerful data recovery software to retrieve deleted or lost data from iPhone, iPad and iPod touch.
Subscribe to:
Posts (Atom)
India’s First Apple Store Will Open in Bandra Kurla Complex, Mumbai
Until recently Apple couldn’t set up exclusive stores in India due to the earlier foreign direct investment rules. However, in the latest bu...
-
When Apple announced the Apple Watch Series 5 last week, it did not talk much about its new S5 chipset and only highlighted the inclusion of...
-
Transfer Everything from My Old iPhone to My New One Transfer Everything to New iPhone Using iTunes If you are familiar with iTunes, you can...
-
Common Solutions These other common solutions will help you to fix “iTunes sync session failed to start” issue, and they are as follows....